Showing posts with label Construction. Show all posts

Sunday, 8 December 2019

Building a center-balcony carriage - part IV

It has been a while since the previous post (part III) on this project. So, time for an update.

Painting 


I tried several shades of green and decided that I painted the carriage with Tamiya XF-5 Flat Green.The Tamiya paint has a lot of pigment and gives a good coverage. It dries nice and clean but you should not 'play' too much with the paint, as you can do with enamel paint. Because the paint dries very fast you can damage the top layer if you go over it with the brush shortly (not directly) after applying. So just apply the paint and leave alone. The roof and chassis were painted with a layer of normal ' household'  acrylic paint from a discount store. In this case it was RAL 8022 which is a brownish black color. Though it looks good on the roof I was not totally sure of it with the chassis. I later repainted the chassis with Tamiya XF 69 NATO Black after placing the rivets (see below).

 
Trying different shades of green.
 
Roof painted with DIY acrylic paint RAL 8022 brown/black

 
The paint was applied with a flat brush for the surfaces and a little brush for spots the big brush could not reach


Rivets


For the simulation of rivets I used little plastic "diamond" half round beads stickers from a discount store. It's the kind of stuff creative mom's and girls use to make all kinds of bling-bling creations. The beads are about 2 mm in diameter and have a self-adhesive layer on the flat side. Although they are called 'diamonds' the beads are just half round balls, so, no ' diamond' surface. The beads are perfect for rivets and much more cheaper (1080 pieces for only 1,50 euro) than the ones you can buy in the model train hobby stores.
Cheap rivets; 1080 pieces for 1,50 euro!


Apply the self adhesive half round beads with a pincet


Painted with Tamiya XF 69 NATO Black


-o-

Monday, 14 October 2019

Building a center-balcony carriage - part III

For the roof I first took a 2 mm balsa sheet as base. Grooves were scribed in to make the sheet bend easier and prevent the sheet to break while bending it in shape over the carriage top.
Because the sheet was only 10 cm wide I had to ad an extra strip of 1 cm to make the bend sheet cover the width of the roof of the carriage. This strip was connected to the sheet using tape at the under side of the sheet. This roof base was not glued to the carriage, only held in place by tape.


At this side you can notice the extra strip

When the base was in the right position and firmly held in place by the tape, a 5 cm wide strip of 1 mm thick balsa sheet was  glued over the base. Contact glue was applied on both the base sheet and the top sheet and than those two pieces were firmly pressed together.
Notice that the tape on the base sheet was left in place and the thinner balsa top sheet was glued over it. This way the base could stay in place. The tape between the sheets is not that thick and will not be noticeable later.


The same was done at the other side, leaving a 1 cm wide opening at the top of the roof, which was filled up with a balsa strip:


Another 1 mm sheet was glued on top of this.The only difference is that I did not left an open space on top of the roof but at one side. This is easier to fill up neatly and it will give more strength to the roof:


Finally it is left to dry for  24 hour.

Hopefully this glued sandwich of 3 balsa sheets (now 4 mm thick in total) will stay in form when the tape is removed. We will see...

UPDATE 16-10-2019:
Yes it worked! After the glue had dried completely I removed the tape and the roof stayed perfectly in shape. Next step will be placing some spacers / supports to keep the roof in the right place.  I draw some lines following the inside walls with a pen through the window openings...) as markers for these.


Back to part II

-o-


Sunday, 18 August 2019

Construction of the station building part IV


Two garden LED lights that have been in service in my garden the last year will become the interior lights for the building. The upper part of the light fixtures themselves will be used as they hold the solar panel. They will be placed on top of the building to collect sunlight.
After opening the light fixture it is clear that it used a 1,2 V 40 mAh battery. The power switches were rusty (but these are actually quit obsolete as I never used those) and will be removed. Considering the rusty state of the battery cells it will be a good idea to replace those with reachable AA or AAA cells.

The wires from the solar panel to the circuit board will be lengthened. As mentioned above the fixtures with panel will be placed on top of the building (disguised as chimneys) and the longer wires run to the circuit boards that will be placed in the building, together with the new batteries, in a way it is easy to access for repair or maintenance.


Opening the light fixture

The battery shows it is a 1,2 V cell. It will be replaced by a 1,2 AA or AAA size cell
Old cell removed. New one shall be connected with wires to B+ and B-
The solar panel will be connected to S+ and S- (here still connected to red and black wire).
The white wires went to the obsolete switch and are now connected together, without the switch.

Lengthened wires connected.


The LED light fixtures are than placed on the roof using hotglue. I added an extra layer of hotglue on the 'chimney's to give more grip if I make the chimney of of cement or Milliput (see later on).


I carved the foam to give the cement more grip on the surface.
Roof tile pattern was 'sculpted using an old screwdriver. There is not only a pattern but also some relief in it. 


-o-


Sunday, 11 August 2019

Construction of the station building part III

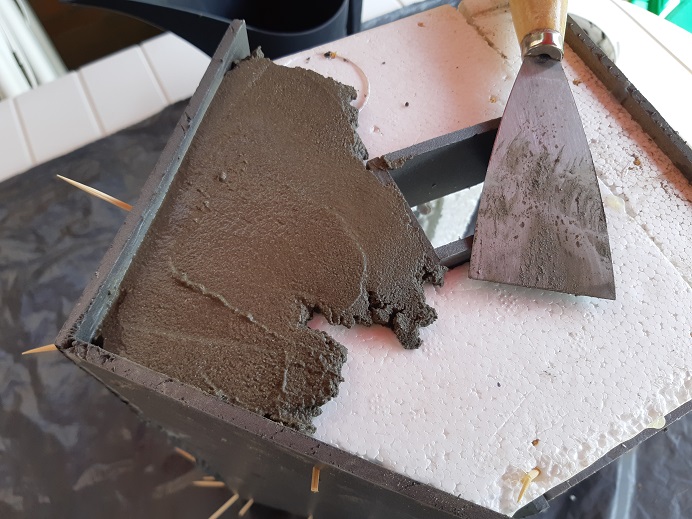
The concrete for the walls is mixed in a ratio of 1 part Portland cement and 2,5 parts fine sand. Add some water until it looks like the mixture below. Too dry mixture will make it crumble when dry and does not stick well on the surface. Too wet is hard to work with as it flows away and sinks.
Just experiment a little with it. Make sure you have enough for the wall(s) you are planning to make.
One or two walls at a time works better than all 4 walls at once; you can lay down the building on a side to apply the mixture horizontal which is much easier than applying it vertical. When dried up a bit you can placing the building with its walls vertical.


As tools I use:
- rubber gloves (the concrete mixture dries out your hands pretty fast!)
- small spatula
- old screwdriver, toothpicks or whatever you find usefll to carve details in the surface
- a sponge is sometimes useful to clean of flatten the surface


Than the fun starts. Aply the mixture on the walls leveling it with the foam used as the doors and window frames.


Use the old screwdriver, toothpicks or other material you like to use to carve in some stonework.
I choose for the same irregular stonework I used at the little mansion but you can off course choose for more regular patterns or even brick pattern. Although I think brick will be challenge to carve in symmetrical. Nature stone work is easier.
I did not carved in windowsills or cornerstones. I will make those in a later stage so it will get some more relief.


Try to make an overlap with the walls that are to be done later. This makes a stronger bond than stopping at the corner itself. 


-o-


Thursday, 25 July 2019

Construction of the station building Part II

Small update. I have cut out window frames and roof from foam underlay floor sheets. The window frames stick out about 5 mm. so they come at the same level as the concrete plaster when applied. At first I tried to make the frames as straight and neat as I could but I gave up on this along the way. Some imperfect window and door frames could give it a bit of dilapidated look that I like more than a neat and perfect building. Lets see if this work.

I forgot to cut out the holes in the roof for the solar lights. That must be done later, when the glue has dried.


-o-

Wednesday, 10 July 2019

Construction of the station building Part I

I started to construct a little station building from scratch. It will be build using the same techniques as used with the small lineside building and the little mansion. The basic forms are made out of Styrofoam parts (bits and pieces from package material) and the walls and roof will be covered with a ' concrete'  mixture.

After making the basic form I draw the outlines of windows and doors. Unlike with the small lineside building I did not made any sketch or drawing. This build is based on a vague idea in my head and the build will go as it flows... Not always a guaranty for a successful result but we see how it goes ;-)

I used a figure for measurement of the doors and windows.


Next step was to cut out all the holes for windows and doors.


I am not sure yet how I will construct the windows and doors. I used balsa wood for the windows on the little mansion but after years these where all damaged, rotten or gone. I used styreen sheets for the windows and doors of the lineside building and that worked fine actually but it was much more laborious to work with.So to combine durability and 'laziness' I want to try an experiment with thin foam sheets (underfloor sheets) I have lying around.

- o -

Sunday, 19 May 2019

Solar powered railcar Part IV

Coach - work in progress

It has been a few weeks, so time for an update!

After building the chassis I started to build a coach. As said the model was loosely based on a Billard draisine that could be found on multiple French metre gauge and narrow gauge railway lines. I choose this simply because I liked the looks of it.
To keep is as light as possible the coach is build op from balsa sheets and cardboard (the backsides of paper notebooks). The coach will be attached to the chassis with small screws from underneath.

The in- and exterior were painted in a grey primer (Humbrol #1). The interior kept this grey color while the outside was painted in white and red livery. The model has sliding doors like some of these Billard draisines had. I left out the engine grille because, well... it is solar powered and not petrol powered after all ;-)

The pictures below shows the work the last weeks. The coach itself is for 90% done. I am still not sure what to do best with the wiring and I still need to figure out a removable roof (for access) that holds the solar panel.

But so far so good:


Priming the doors
 
Painting the coach in my 'neat and tidy' workshop...


- o -