Showing posts with label Buildings. Show all posts

Sunday, 18 August 2019

Construction of the station building part IV


Two garden LED lights that have been in service in my garden the last year will become the interior lights for the building. The upper part of the light fixtures themselves will be used as they hold the solar panel. They will be placed on top of the building to collect sunlight.
After opening the light fixture it is clear that it used a 1,2 V 40 mAh battery. The power switches were rusty (but these are actually quit obsolete as I never used those) and will be removed. Considering the rusty state of the battery cells it will be a good idea to replace those with reachable AA or AAA cells.

The wires from the solar panel to the circuit board will be lengthened. As mentioned above the fixtures with panel will be placed on top of the building (disguised as chimneys) and the longer wires run to the circuit boards that will be placed in the building, together with the new batteries, in a way it is easy to access for repair or maintenance.


Opening the light fixture

The battery shows it is a 1,2 V cell. It will be replaced by a 1,2 AA or AAA size cell
Old cell removed. New one shall be connected with wires to B+ and B-
The solar panel will be connected to S+ and S- (here still connected to red and black wire).
The white wires went to the obsolete switch and are now connected together, without the switch.

Lengthened wires connected.


The LED light fixtures are than placed on the roof using hotglue. I added an extra layer of hotglue on the 'chimney's to give more grip if I make the chimney of of cement or Milliput (see later on).


I carved the foam to give the cement more grip on the surface.
Roof tile pattern was 'sculpted using an old screwdriver. There is not only a pattern but also some relief in it. 


-o-


Sunday, 11 August 2019

Construction of the station building part III

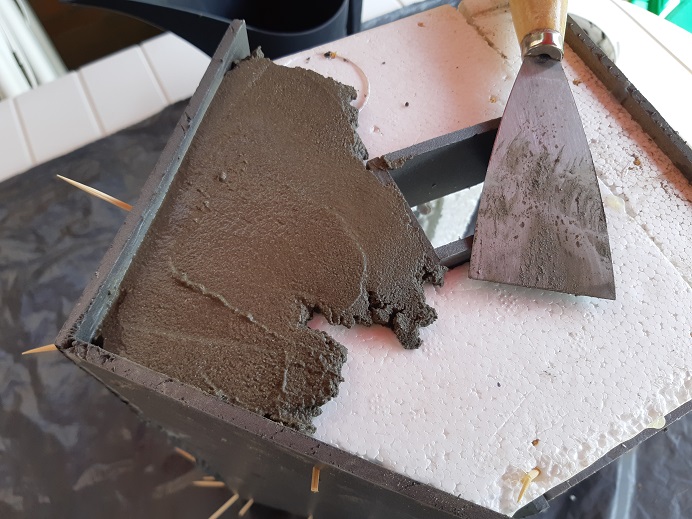
The concrete for the walls is mixed in a ratio of 1 part Portland cement and 2,5 parts fine sand. Add some water until it looks like the mixture below. Too dry mixture will make it crumble when dry and does not stick well on the surface. Too wet is hard to work with as it flows away and sinks.
Just experiment a little with it. Make sure you have enough for the wall(s) you are planning to make.
One or two walls at a time works better than all 4 walls at once; you can lay down the building on a side to apply the mixture horizontal which is much easier than applying it vertical. When dried up a bit you can placing the building with its walls vertical.


As tools I use:
- rubber gloves (the concrete mixture dries out your hands pretty fast!)
- small spatula
- old screwdriver, toothpicks or whatever you find usefll to carve details in the surface
- a sponge is sometimes useful to clean of flatten the surface


Than the fun starts. Aply the mixture on the walls leveling it with the foam used as the doors and window frames.


Use the old screwdriver, toothpicks or other material you like to use to carve in some stonework.
I choose for the same irregular stonework I used at the little mansion but you can off course choose for more regular patterns or even brick pattern. Although I think brick will be challenge to carve in symmetrical. Nature stone work is easier.
I did not carved in windowsills or cornerstones. I will make those in a later stage so it will get some more relief.


Try to make an overlap with the walls that are to be done later. This makes a stronger bond than stopping at the corner itself. 


-o-


Thursday, 25 July 2019

Construction of the station building Part II

Small update. I have cut out window frames and roof from foam underlay floor sheets. The window frames stick out about 5 mm. so they come at the same level as the concrete plaster when applied. At first I tried to make the frames as straight and neat as I could but I gave up on this along the way. Some imperfect window and door frames could give it a bit of dilapidated look that I like more than a neat and perfect building. Lets see if this work.

I forgot to cut out the holes in the roof for the solar lights. That must be done later, when the glue has dried.


-o-

Wednesday, 10 July 2019

Construction of the station building Part I

I started to construct a little station building from scratch. It will be build using the same techniques as used with the small lineside building and the little mansion. The basic forms are made out of Styrofoam parts (bits and pieces from package material) and the walls and roof will be covered with a ' concrete'  mixture.

After making the basic form I draw the outlines of windows and doors. Unlike with the small lineside building I did not made any sketch or drawing. This build is based on a vague idea in my head and the build will go as it flows... Not always a guaranty for a successful result but we see how it goes ;-)

I used a figure for measurement of the doors and windows.


Next step was to cut out all the holes for windows and doors.


I am not sure yet how I will construct the windows and doors. I used balsa wood for the windows on the little mansion but after years these where all damaged, rotten or gone. I used styreen sheets for the windows and doors of the lineside building and that worked fine actually but it was much more laborious to work with.So to combine durability and 'laziness' I want to try an experiment with thin foam sheets (underfloor sheets) I have lying around.

- o -

Saturday, 2 March 2019

The little mansion

The little mansion was build around 2012 for my previous garden railway. 
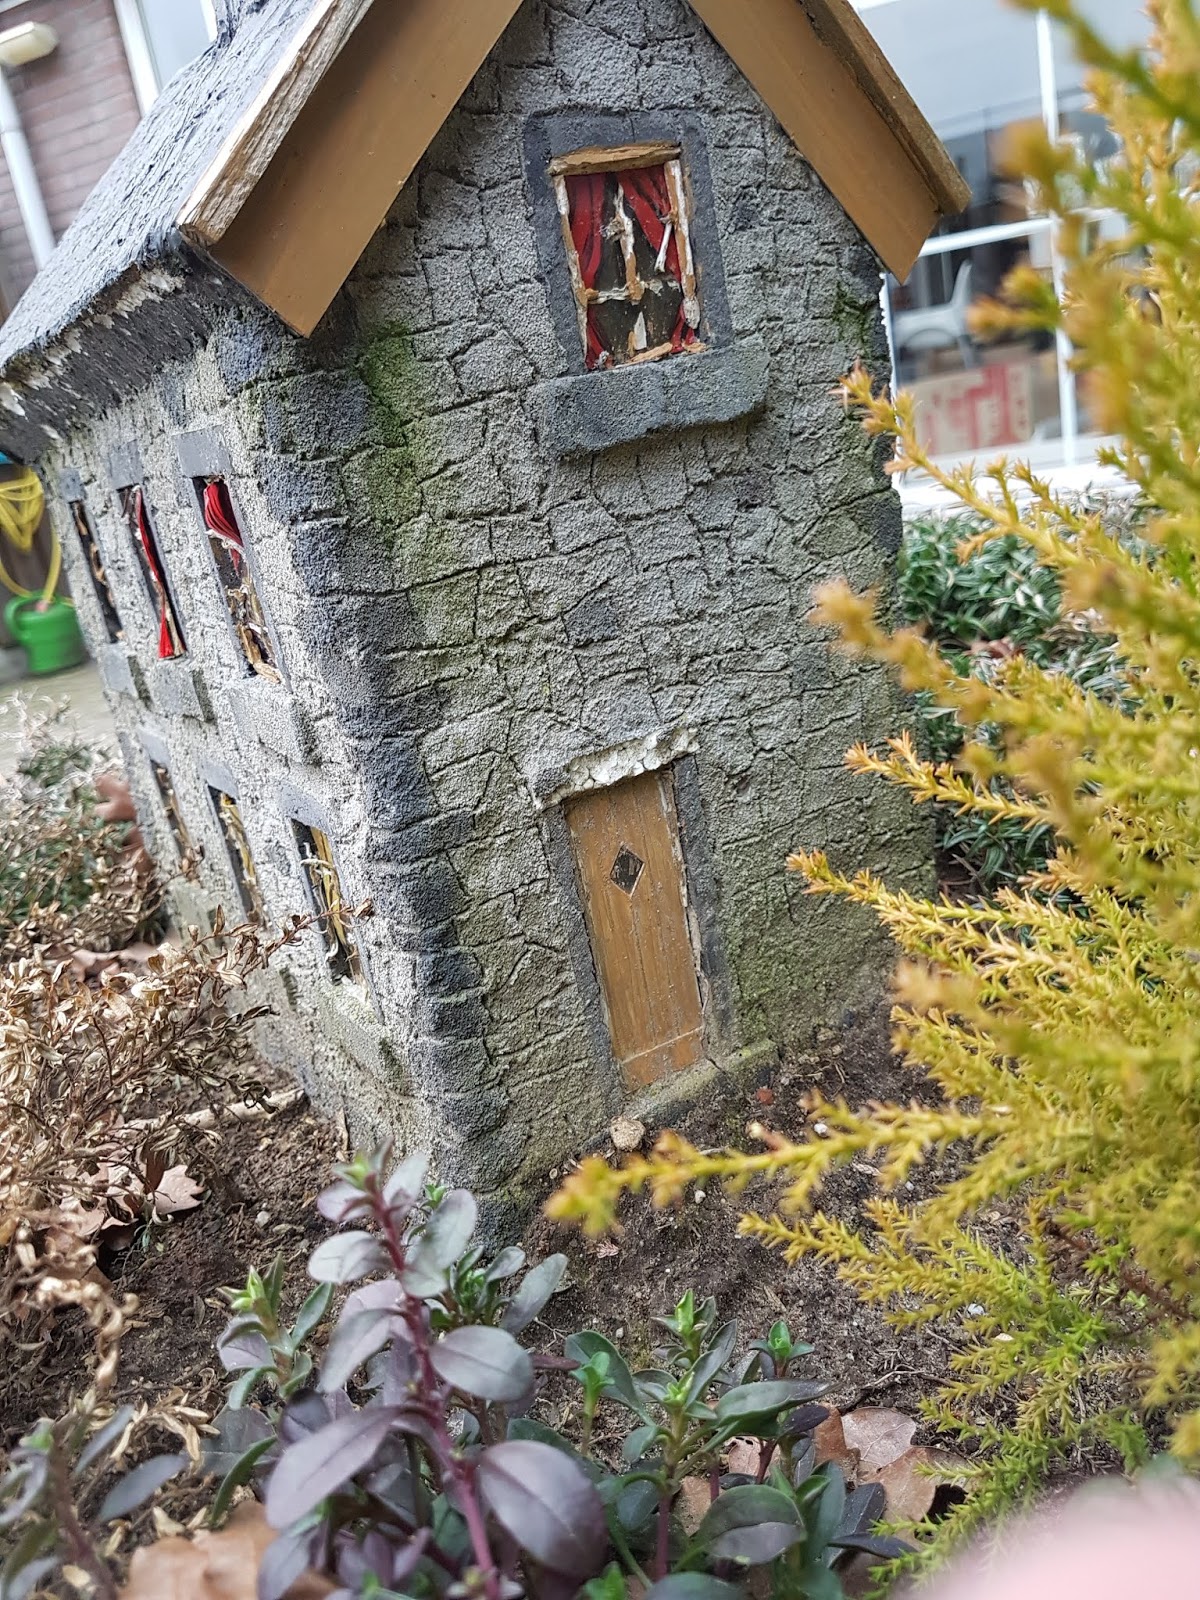
It was my first building using styrofoam covered with a cement / concrete mixture and in fact it formed the base for my later buildings that were constructed in the same way. It was a very nice learning process. The building itself was loosely inspired to mid-European countryside houses, like those in the Ardennes / Elzas regions.

The construction does not differ much from the little lineside building so I won't good too deep in the details. I'll just mention the differences and some techniques I used, like the roof ornament.

At the bottom of the article you will find some pictures of the condition the mansion in February 2019, some 7 years after it was build and in which the building was outside all year round.


Construction

The first main difference is that I used much thicker pieces of styrofoam which make the base very solid. Here you can see some pictures of the very start of the mansion.


Base formed by styrofoam blocks and sheets

Applying the first layer

The stonework pattern of the walls was scribed in the half-dry layer of concrete mixture using all sorts of high tech tools, like an old screwdriver, a rusty nail, a piece of iron wire, tooth sticks or whatever else I could find and worked well. It was a lot of fun to do and you hardly can go wrong. But if you somehow do, just erase the scribe line with your finger gently and try again. 
Window sills, corner stones, settings, foundation stones and several the stones were painted in different kinds of grey to give it more variation and detail.  I used acrylic hobby paint from the DIY store. 

A plastic funnel that had the right size and from which the tube was cut of, was used as base for the tower roof. On the plastic I used a thick layer of construction glue to shape into roof tiles. This works about the same as scribing in the walls stonework, though you have to work a bit quicker as the glue dries faster. I also used a thick layer of construction glue on the main roofs, applied on the dry layer of concrete. The roof was painted dark grey and lines between the tiles were accentuated using black paint.


Stonework

Painting

Funnel and balsa bridging roof


Construction glue used for roof tiles

For the construction of the window frames I used (balsa)wood. This later turned out to be NOT a good choice, weatherproof wise. This is the same for the little bridging roof between the main roof and the tower, which base was made from 2 pieces of balsa. I'll come back on this further below.

The windows were not really cut out like the line-side building, but there was a rectangular space left open at the places were the windows were planned, as you can see on the picture below. 
The styrofoam in the window openings was painted black. Between the window frame and the styrofoam a thin transparent sheet of plastic was placed as glazing. Curtains were painted on the inside of the glazing using the acrylic paint.

Construction of the windows

The chimney was made from a piece of styrofoam, glued with construction glue to the roof. Stonework was scribed in a layer of concrete. Two plastic tubes formed the smoke channels.

Chimney

The roof ornament on the tower roof was formed by a piece of iron wire stuck in the top and three nice looking beading beads that were later painter black.

Roof ornament from beading beads

On both sides the roof got a roof molding made from styrene plastic and a piece of wooden 4x4 mm strip, painted with acrylic paint. This covered up the styrofoam at the roof sides, but looked a bit out of scale.

Roof moldings

Situation 2012

And the three pictures below shows was the building looked like when just finished in 2012, on the old layout:


 And be aware that this building was outside, the whole year round, year after year...


Situation 2019

And the pictures below shows how it looks like in February 2019, seven years later.
Although it looks nice from a distance a closer look quickly reveals several damages.
Some damages are caused by moving to another home but most of it was caused by weather influences. But besides the damages the overall condition of the building is not bad, considering it is outside the whole year!

Damaged roof and windows but overall not too bad

Some windows still in place

The most to be expected damages were the parts made from balsa wood. Almost all the balsa window frames came loose and disappeared or have rotten away. Some styrofoam chipped away at the bottom of the roof, above the windows, most likely due to transport. But the walls still look great!

Damaged and disappeared window frames

Not surprisingly the small balsa based bridging roof was damaged too. The balsa was completely gone. However, the ridge of this roof (sculpted from construction glue when the roof was still in place) still holds up, while the balsa is all gone!


The construction glue applied on the funnel that formed the base of the tower roof is peeling off.


The styrofoam from the chimney has partly disappeared. It became a bit hollow...


The walls that were on the north side turned green nicely. I actually don't mind the look of it.
The smoke channels from the chimney are gone. Both doors were made from styrene and looks still very neat. The acrylic paint on parts and roof has not faded. Some paint chipped off at the underside of the roof (where it was painted directly on the styrofoam). 

Love the look of the aged wall

Little damage above the door. Still the stonework looks great!

Some valuable lessons were learned during the build of this house but also seven year later while evaluating its condition.
- Balsa wood is going to be absolutely out of the question for other buildings; better use styrene instead;
- the concrete / cement mixture on styrofoam is a very endurable construction;
- details in the concrete (stonework etc) are still in good condition;
- parts made from styrene holds up very nice;
- the acrylic paint keeps it color reasonable well, especially on the stonework;
- the construction glue keeps up great when applied on the concrete but peels of from the plastic parts.
  
Somewhere this year I will gave this building some well deserved overhaul. Actually, I guess when I had bothered to do a quick check-up once a year with some little maintenance this building would have been in a better condition. So the final lesson: check and maintain on regular base prevent a lot of work later!  Just like an ordinary house ;-)


"Narrow Gauge In The Garden" video series


An other 'classic' series of videos that can be found on YouTube is "Narrow Gauge In The Garden" presented  by Ian Stock and filmed by Mark Found, who later produced the television broadcasted series "The Garden Railway".

Although this series is a bit dated and the HD quality not as good as we once thought it was it shows some really fantastic and atmospheric garden railways. I found it very inspiring and got a lot of ideas from it. In each episode a different garden layout is visited and a specific topic is discussed. The focus is on UK theme narrow gauge railways.

The series can be found on YouTube on The Railway Channel but I also made a summary below with direct links. Needless to say that the one about small gardens is my favorite!

Narrow Gauge In The Garden

Small Gardens
Large Gardens
Difficult Terrain
Layouts
Horticulture
A visit to the Roundhouse factory
Photography
Cwmcoe
Tarren Hendre
Weathering Part I
Weathering Part 2


Tuesday, 26 February 2019

"The Garden Railway" television series by Mark Found


On YouTube there are a lot of video's about garden railways. Some better than others.

A very interesting series of videos in my opinion is "The Garden Railway" made by Mark Found for broadcasting on television on the Discovery Channel. I believe it actually came out on DVD in 2001 as well. It can be considered a real classic by now!


In 15 episodes from about 23 minutes each it describes the build of a garden railway from start to finish in a clear and often funny way of presentation. It is an introduction to the hobby which mention most basic steps of building a layout and what techniques can be used.
In each episode garden railways from other modellers are visited which provide some beautiful scenes and a lot of inspiration.

The whole series can be found on the YouTube channel ModelRaiwayTV but I have made a little summary below with direct links to the episodes.

The Garden Railway episodes:

 1 Design
 4 Rockery
 6 Bridges
 8 Power
 9 Control
10 Shed
11 Models
15 Finale